Monday, February 18, 2013

Cinnamon Roll Pancakes

I was craving cinnamon rolls all week so decided to try these for breakfast on Valentines day. If you click on the pin on my board, it takes you here, but the actual recipe is from Recipe Girl


I was thinking that I would just make my normal pancakes and add the cinnamon swirl to it.  I saw this after the recipe:

Quick and easy tip: Use a boxed pancake mix as the base for this recipe.

Read my mind!  Here's what I used (and I added chia seeds to it):


The finished pancake batter:


So I followed the directions for the cinnamon swirl mix: 

CINNAMON FILLING:
4 tablespoons (1/2 stick) unsalted butter, just melted (not boiling)
1/4 cup + 2 tablespoons packed light brown sugar
1/2 tablespoon ground cinnamon

Prepare the cinnamon filling: In a medium bowl, stir together the butter, brown sugar and cinnamon. Scoop the filling into a quart-sized heavy zip baggie and set it aside.

I made the filling and then put it in a candy squeeze bottle since I figures it would be easier to use:


Next, I made the glaze:

CREAM CHEESE GLAZE:
4 tablespoons (1/2 stick) unsalted butter
2-ounces cream cheese, at room temperature
3/4 cup powdered sugar
1/2 teaspoon vanilla extract

Prepare the glaze: In a small pan, heat the butter over low heat until melted. Turn off the heat and whisk in the cream cheese until it is almost smooth. Sift the powdered sugar into the pan, stir and add in vanilla extract. Set the pan aside while you make the pancakes.

I did this the easy way and put the butter in the microwave to melt it!


The directions:

Cook the pancakes: Heat a large, nonstick skillet over medium-heat and spray with nonstick spray.

I used olive oil in a Misto sprayer.  

Use an ice cream scoop (or 1/3 cup measuring cup) to add the batter to the pan. Use the bottom of the scoop or cup to spread the batter into a circle (about 4-inches in diameter).

I estimated and got 9 pancakes, so mine were slightly smaller.

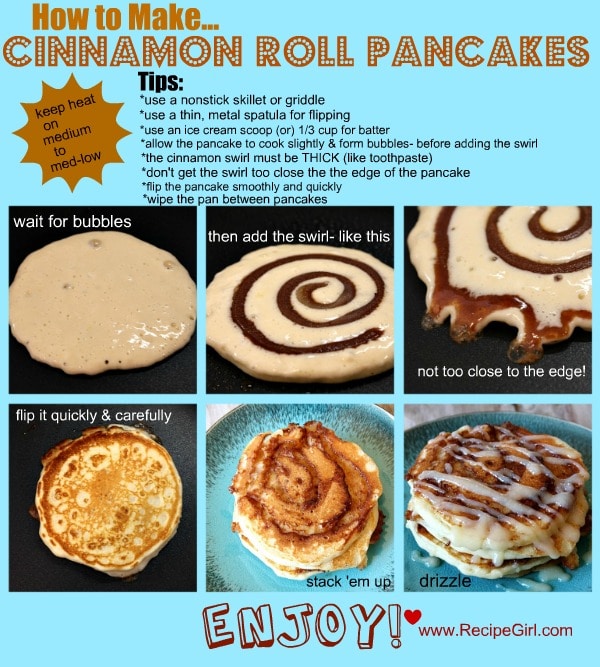
 Reduce the heat to medium low. When your pancake begins to form bubbles, add the filling. Starting at the center of the pancake, squeeze the filling on top of the pancake batter in a swirl (just as you see in a regular cinnamon roll).

*Tips for the cinnamon filling: Before swirling, open up the baggie again and give it a good stir to re-incorporate any butter that may have separated from the sugar. You want the mixture to thicken a bit- it's best when it's similar to the squeezing texture of a tube of toothpaste, which will happen if you leave it at room temperature for several minutes. Don't try to use the filling for the pancake swirl unless it has thickened as it will be too runny to make a solid swirl.

Important!  

What happens if you don't mix the filling.  I probably should have paid more attention to the tips.


And then once you mix it:


It started to thicken by the 4th pancake and was hard to squeeze:


So my solution was to keep the filling in hot water to keep it melted.  It worked like a charm:


My stack of pancakes:


And with the glaze:


Not only did these pancakes smell wonderful, they tasted awesome!  They were like cinnamon rolls without all the extra frosting and sugar.  I offered half of the pancakes to my sister.  She said she would "try one," and ended up eating 4.  Her exact words, "oh my god, these are amazing!" And, the best part: I used high fiber, whole grain mix and added chia seeds, so even with the added butter and sugar, it was decently healthy and didn't taste like it!  These were 10 times better than the cake batter pancakes I tried a couple weeks ago.  These are worthy of a birthday morning tradition!  By the way, I had leftover filling and glaze, so I'm making these pancakes again soon.  :) 

Bottom Line: LOVED IT!!! (Literally the best thing I've tried from Pinterest thus far!)

Tuesday, February 12, 2013

Warm Cinnamon Swirls

I LOVE cinnamon rolls and pretty much anything with cinnamon in it! I really want to try making cinnamon rolls from scratch, but I had some extra crescent roll dough that I had to use, so I opted to make it this way instead.  They're 1 Weight Watcher Plus point each if you follow the recipe. Here's the blog I got the recipe from.

The required ingredients:

8 ounces reduced-fat crescent rolls (I used normal crescent rolls, Walmart brand*)
4 teaspoons sugar-cinnamon
1/2 cup powdered sugar
2 teaspoons skim milk (I used 2%)

 *NOTE: Don't use Pilsbury brand rolls because they have trans fat in them even though it says 0g on the label.  It has partially hydrogenated oil listed as an ingredient which means that there's <.5g of trans fat per serving, but not really 0g.  Sorry I'm going off on such a tangent, but I'm a biology major/chemistry minor and let me tell you, you DO NOT want to put any amount of trans fat into your body!  It's unnatural and clogs your arteries.  Not worth it).  

Anyways, mine probably weren't 1 point each since I used normal crescent roll dough and 2% milk, but I'm not on Weight Watchers so it doesn't really matter to me.   Personally I don't like anything that says "reduced fat," "sugar-free," etc. because that means they took away one ingredient and added something else to make it still taste good (i.e. reduced fat usually means that they took away some of the fat and added more sugar).

And the directions are as follows:

Unroll crescent dough; separate into 2 pieces. Press perforations together and sprinkle each with half of the sugar-cinnamon. 


Roll up 1 section, starting on long side and press firmly to eliminate air pockets. Pinch seam to seal. Cut each roll into 10 slices (For a total of 20 slices)


Place rolls on baking sheet coated with cooking spray. Bake 10-12 minutes at 375 degrees. 

I baked mine for 10 minutes:


Once golden brown remove from oven. Whisk together powdered sugar and milk. Pour over warm rolls.


The final product.  How cute are these? 


They turned out smaller than I expected (must be why they are only 1 point), but they were tasty.  They weren't exactly "cinnamon rolls" since they had that crescent roll taste and weren't as soft as your typical roll, but overall the taste was good.  It's definitely easier than cinnamon rolls from scratch and healthier than the cinnamon rolls you buy pre-made in metal rolls (those have trans fat too!)  Plus, they're perfectly portioned so you don't go overboard on dessert, and would be great for a party snack or dessert.  

Bottom Line: LOVED IT! 

Friday, February 8, 2013

Pineapple Angel Food Cake

2 ingredient Angel Food Cake sounds amazing!  Seems like it would be a fast, easy dessert that would be great to bring to a party and leave the other guests asking for the the recipe.


Here's the description of the pin:

Take a box of Angel Food Cake mix & combine it with a 20 ounce can of crushed pineapple in its own juice. When you do this, something magical happens. The mixture starts to froth & it turns into an amazingly airy, fluffy bowl of deliciousness right before your eyes. Simply pour it into a 9 x 13 cake pan & bake 350 for 30 minutes.

When I clicked on the link, it took me to http://www.dawnsquiltcorner.com/ and I couldn't find the original blog post, so I just had the pin description to go off of.  

So I got the ingredients:


And mixed them together:


Light and frothy just like the pin said!  Actually a little too frothy...


It kept expanding so I put some on the mixture into small loaf pans:


And baked it.  It actually started to shrink as soon as I put it in the oven.  I guess I didn't need to separate the mix.  I left mine in for 28 minutes:


Probably didn't need that much time. 

Here's a slice:


I don't know if you can tell from the picture, but the cake is very DENSE!  It tastes like angel food cake, but it's weird because it's not the consistency you would expect.  It's dense and sort of spongy, not in the same way as regular angel food cake, and has awkward chunks because of the pineapple.  The flavor overall is not bad, the the consistency of it is unappetizing.  My mom, dad, and sister tried it too and did not like it either.  I ended up throwing out the rest of the cake.  Cool idea, but it didn't pan out the way I was hoping it would. 

Bottom Line: NOT WORTH IT! 

Thursday, February 7, 2013

Ramen Noodle Upgrade

Turn your everyday ramen noodles into a quick Pad Thai.  Sounds awesome, right?  The pin for this recipe had a link to ONnline Recipe Directory but the original recipe is Martha Stewart. 


The ingredients you need:

  • 1 package Ramen noodles
  • 1 pack noodle flavoring (Mine was chicken flavored)
  • 1 tablespoon soy sauce
  • 2 tablespoons chunky peanut butter
  • 2 teaspoons Sriracha
  • 1/2 scallion, thinly sliced (optional)
Simple instructions:  

Boil noodles with flavor pack and drain off most liquid. Toss with soy sauce, peanut butter, and Sriracha. Garnish with scallion. Eat immediately.

Lunch ready in under 5 minutes.  Score!


I can't say I've had too many Pad Thai dishes so I can't really compare this to any other Pad Thai, but I liked it.  Tasted spicy and peanutty.  At first I thought it was pretty mild, then after eating over half the bowl, the spices kicked in.  This may be because I'm pretty much a wimp when it comes to spicy food.  So for me personally, I'm going to use less sriracha next time, but you might like it with the 2 teaspoons, or even more.  Also,  I think that adding some more protein, like shrimp or chicken, would also work well with this dish.

The only complaint I have about the dish is that it's pretty high in carbs and calories.  It has almost 600 calories and 60g of carbs (if you eat the whole thing).  So, eat half and make a side salad!

Bottom Line: LOVED IT!  
 

Wednesday, February 6, 2013

Pizza Quesdilla

I was craving pizza for lunch so I decided to try this pizza quesdilla recipe.


The recipe is for 4 quesdillas.  I made just one for me! 

Here are the ingredients you need: 

4 Fajita-size Flour Tortillas or Wraps
1 Cup Mozzarella Cheese
32 Slices Pepperoni (I used Turkey pepperoni)
1/2 Cup SUPER EASY pizza sauce (or canned/jarred pasta sauce) I used bottled Ragu pizza sauce

Here are the ingredients that I used: 


The Directions: 
 
Spray non-stick skillet (Medium Heat) or flat griddle with cooking spray.   Place Tortilla flat on skillet.  Put 2 TBSP pizza sauce on half of the tortilla, 1/4 C. Cheese, and 8 slices of pepperoni over the sauce.   Fold the empty side over and grill until golden on both sides.

Fast, simple, and easy!  Just what I like in a recipe. :)

I put it together on a plate then transferred it to my pan:


After flipping it over.  Nice and golden brown:


The final product:


This quesadilla completely satisfied my pizza craving.  I actually thought it was better than a lot of frozen pizzas because the "crust" was actually super crispy!  Plus, this is definitely lower carb and healthier than a lot of frozen pizzas (especially since I used turkey pepperoni-only 45 calories for the slices I used). I can't wait to try this again with other pizza toppings.  I'm sure it would be awesome with just cheese too!

Bottom Line: LOVED IT!

Tuesday, February 5, 2013

Apple Cinnamon Whole Wheat Pancakes

I decided to make pancakes this morning because it is National Pancake Day (that means you can get free pancakes at IHOP today)!  After reading the description of this pin, "METABOLISM INCREASING Apple Cinnamon Whole Wheat Pancakes ONLY 43 calories each!" I had to repin it and try it!  Low calorie pancakes with one on my favorite things, cinnamon! 

Just look at the nutrition information for this recipe:
Each pancake has: Calories: 43, Fat: .5g, Fiber: .25g, Protein: 1.5g, Carbs: 7g
They are really low-carb and diabetic-friendly!   Is this recipe too good to be true? 


Here's the recipe:

Makes 20 pancakes
(I halved the recipe and got about 8 pancakes)
 
4 oz Unsweetened Apple Sauce (the little cups are 4 oz)
1 cup Almond Milk
1 tsp Vanilla Extract
2 Eggs
1  1/4 cups Whole Wheat Flour
1 tablespoon Brown Sugar
4 teaspoons Baking Powder
3/4 teaspoon Salt
1 tsp Cinnamon
Optional: Maple Syrup- adds only 53 calories per tbsp (I'm not a fan of maple syrup, so I skipped this)


In a large bowl combine flour, sugar, baking powder, salt and cinnamon set aside. In a medium bowl combine the milk, apple sauce, eggs and vanilla and whisk well. Pour the wet mixture into the dry and mix well.

I whisked my wet ingredients than added all the dry ones with out combining them first.  Why dirty more dishes?  


Let this mixture sit for 10 minutes to an hour, it will rise and fluff up a little.

I let my batter sit for about 15 minutes.  I don't know if letting it sit longer makes a big difference-I was hungry and not willing to wait that long!

Heat a griddle or large skillet on medium, spray with cooking spray and using a ladle pour your pancakes, once they bubble all over it is time to flip.

Make sure you put plenty of cooking spray on the griddle because otherwise the pancakes will stick! 


Never squish down only flip once, good pancakes are fluffy because they have been treated with care.

Good Advice!

My stack of pancakes:


These pancakes had a good consistency-they were light and fluffy. They taste like whole-wheat pancakes with less sugar than the store bought variety plus hints of apple and cinnamon.  Personally, I think that they can use some more cinnamon and apple flavor.  My mom tried them and said "you should have added more cinnamon."  When I make them again, I'm going to double the cinnamon and maybe even add more applesauce and sugar.


Bottom Line: LOVED IT!


Monday, February 4, 2013

Copycat Starbucks Passion Tea Lemonade

Passion Tea Lemonades are hands-down my favorite drink at Starbucks.  I have made them at home before, but since I didn't know the exact tea to lemonade ratio, they did not taste the same. I was hoping that this recipe would solve this dilemma for me..


Here's the blog the recipe came from.

The Directions:

Each box of tea comes with 20 tea bags. Put them all in the bottom of a gallon pitcher. Then boil 1 gallon of water in a pot on the stove.  Once your water boils, pour it over your tea bags. Let it steep for 7-10 minutes. The longer it steeps, the stronger the flavor.  Once it is finished steeping, use one spoon to scoop out one bag at a time.Since the water is still hot, I use a second spoon to squeeze out more flavor from each bag before I toss them.  Once you have all your bags removed, you place the pitcher in the fridge for it to cool.

I didn't want to make a whole pitcher so I made a mug of passion tea and put it in the fridge.
 
In order to get the right measurements, I used a starbucks cup. They are selling these re-usable plastic cups right now and I really like mine. Fill your cup with tea to the second line (about 9 oz). Then add your lemonade until you reach the third line (about 3 oz).

You don't really need the Starbucks cup; you just need to know the ratio: 9oz tea to 3oz lemonade.  Gold! 

Here's my passion tea lemonade (don't you love the cup): 


Optional: 
 
When you buy this drink at the store, they pump their "classic syrup" into the drink. It's a clear syrup, so I'm guessing its a basic "simple syrup". To make a simple syrup you just bring 1 cup of water and 1 cup of sugar to a boil and let cook for a minute or so until the sugar is all dissolved. Let it cool in the fridge and you get a nice sugar syrup. Add this, or any other sweetener you like, to the tea. Adjust it to the sweetness you like.

Personally I think the lemonade has enough sugar in it already, so I don't ever add sweetener to my drink. 

The passion tea I made at home tasted just like the one I order at Starbucks.  Score!  

Bottom Line: LOVED IT!