Sunday, April 21, 2013

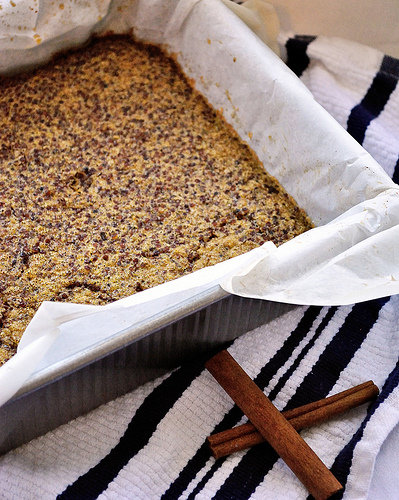
Cinnamon Quinoa Bake

It seems like I am always rushing to work and I don't have time to make breakfast, so I resort to the same couple of grab and go items everyday, which is getting really boring.  I've seen a lot of pins that say make this on Sunday and have breakfast for the whole week.  Sounds amazing, right?  So, I decided to try one of those recipes


Here's the Pin description:
Chowing down a big bowl of quinoa is a satisfying and delicious way to de-bloat. Not only is quinoa protein-packed and rich in fiber, but it's also chock-full of potassium! If you want to mix up your typical bowl of quinoa in an oatmeal setting, then opt for this creative spin that has metabolism-boosting properties. A cinnamon quinoa bake is a sweet, protein-packed treat to start off your day.

Here's the description of the recipe from POPSUGAR:
This sweet take on quinoa is perfect for breakfast or a midmorning snack. It's even better with a dollop of nut butter and a cup of tea!  Recipe from Gabby's Gluten-Free
  
Ingredients you need: 

2 1/2 cups quinoa, cooked and cooled
4 eggs, beaten
1/3 cup vanilla soy milk
1/3 cup maple syrup (optional) (I left this out since I don't like maple syrup)
1 teaspoon vanilla extract
1 tablespoon cinnamon
 

Directions

1. Preheat the oven to 375ºF and place the quinoa in a large mixing bowl. Line an 8-by-8-inch baking pan with lightly greased parchment.
2. In a small bowl, whisk together eggs, soy milk, vanilla extract, and cinnamon until thoroughly combined. Add maple syrup (if using) and whisk.


3. Add egg mixture to cooked and cooled quinoa. Stir with a large spoon to combine. Pour into the parchment-lined baking dish and spread it around to ensure that it’s even.


4. Bake for 20 to 25 minutes until set and golden.


5. Using parchment, remove bake from pan as soon as possible so that it doesn’t steam.


6. Cool completely and cut into squares. Serve with a dollop of nut butter. I put Trader Joe's cookie butter on it!


The bake tasted good, but was not sweet enough, probably because I opted to skip the 1/3 cup of maple syrup.  I added the cookie butter rather than peanut or almond butter to add some sweetness, and it worked.  I want to try it again with some agave syrup in the batter to sweeten it up. 

Bottom Line: LOVED IT! 

Saturday, April 13, 2013

Zebra Striped Cake

One of my best friends, Megan, loves zebra print everything, so when I stumbled across this pin to make a zebra striped cake, I knew this was totally happening for her birthday!  Here's the site the pin lead to, and here's the site with the detailed description on how to make zebra stripes.


First step, make the cake batter. The tutorial page said they used Duncan Hines Devil’s Food Cake and Duncan Hines French Vanilla.

We chose these because they don’t have pudding in the mix (like Pillsbury & Betty Crocker, which can be a little thick for this project–although I love them for anything else). We made slight changes to the box directions: French Vanilla Cake– We used 1 cup plus 3 Tablespoons Water rather than the 1 cup that it calls for. Devil’s Food- We used the box directions, no changes

I chose to make my cake from scratch.  Here's their advice for that:
 
As a side note, if you would like to try this cake with a scratch recipe, you can choose your favorite white or yellow cake recipe and then divide it approx. in half– you can stir approx 3 tablespoons or so of dutch processed cocoa powder into one of your bowls of batter to create chocolate batter.

Here's the recipe I used.  I read the recipe on the unsweetened cocoa powder box for a chocolate cake said to use 3/4 cup of cocoa powder.   I gradually added the cocoa powder and tested the batter.  I ended up using the whole 3/4 cup.  

Here's my finished batters:


Then...

We started by dropping 1/4 cup of vanilla batter into the middle of our 8″ pan.  It will spread a little bit. Then...Measure out a 1/4 cup of chocolate batter and pour it in the center of your vanilla batter. Repeat this process, continuing with 1/4 cup scoops of alternating flavors, each flavor of batter dropped into the center of the previous circle of batter. The batter is thin enough that it does not take long at all for the batter to spread out a little bit.

My cake batter was too thick:
 

I added 1/4 cup more of milk, and it started spreading better...but not well enough.  Looks like I need to use thinner batter to make this work better:


Time to bake the cake.  This was how it turned out.  I was really nervous to cut into it...


But, it came out with stripes and the birthday girl loved it: 


My cake's stripes were thicker than the picture from the tutorial, but it still looked cool.  Maybe using 1/8 of a cup of batter at a time would have been better since my batter was on the thick side.

Overall, it was a success.  It was definitely time consuming to make two batters and layer them, and it was frustrating since my batter was thick, but it worked!  The cake itself tasted great, and would be a great cake to make for an occasion instead of using a box mix that contains trans fat.

Bottom Line: LOVED IT!

Wednesday, April 3, 2013

Crescent Pizza Rolls

If you read my blog, you can tell what my favorite foods are...one of them being pizza! Here's another pizza recipe I stumbled upon on Pinterest and tried. 


You only need 5 ingredients: 

1 can refrigerated crescent rolls (I used Walmart brand since they contain NO trans-fat!)
40 slices turkey pepperoni (but any kind of pepperoni would work)
4 pieces of mozzarella string cheese, cut in half
garlic powder
pizza sauce

And it's super easy to assemble:
Unroll crescent rolls and separate into 8 triangles.  Place 5 slices of turkey pepperoni on each crescent roll.  Top pepperoni with string cheese half and roll up.

 All rolled up:


Then,
Sprinkle crescent rolls with garlic powder.  Place rolls on baking sheet and bake for 12-15 minutes, or until golden brown.  Serve with a side of warm pizza sauce.

Here's my finished product.  The cheese was a little messy:


 So, next time I know not to put the cheese too close to the edge and to fold the sides up after rolling! I guess I missed that little technique.  

These rolls are not only super easy to make, but super tasty.  I love pizza so anything with bread, cheese, and sauce is usually okay in my book.  The one complaint I have is that there's a lot of bread and not enough filling, so next time I would try to either put more cheese and/or turkey pepperoni.  

Bottom Line: LOVED IT!

Friday, March 29, 2013

Oven Roasted Broccoli

I eat broccoli all the time as a side dish with my dinner.  I usually steam it in the microwave and eat it plain or with a little cheese on top.  Boring, right?  So when I saw this pin I was excited to try something new with my Costco-sized bag of broccoli!  


The pin description (from Foodie):

This is our favorite way to eat broccoli of all time! My husband says he would rather eat this than fries. I put a few Tbsp of olive oil in a ziploc with some salt and pepper and the broccoli and shake. Then spread on a cookie sheet and spread minced garlic over it and roast at 425 deg F for 20-25 minutes.

I wish that there were more specific measurements.   I used 3 cups of broccoli, 3 T oil and 2 cloves of garlic.

Here's the broccoli after shaking it in the bag:


And before I popped it into the oven:


This is after baking for 25 minutes:


Both me and my mom loved the flavor of this broccoli, but agreed that I put too much olive oil and not enough minced garlic.  So next time I will add less oil, probably 2 Tbsp and double the garlic (4 cloves).  I don't think this is better than fries, but definitely beats the same old, plain, steamed broccoli I generally eat. I probably won't turn the oven on to make this side dish, but it's definitely worth it if the oven is already on for dinner.

Bottom Line: LOVED IT! 

Thursday, March 28, 2013

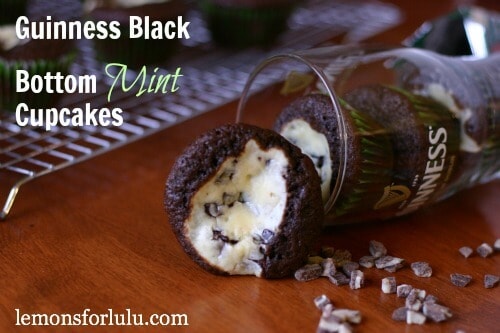
Guinness Black Bottom Mint Cupcakes

I am obsessed with Guinness! A lot of people tell me that they don't like Guinness because its too dark and bitter, but it is really one of the only beers I enjoy. It's exceptionally delicious when you pair it with chocolate because it enhances the chocolate flavor. I was excited when I found this recipe since its similar to Betty Crocker's Dalmatian Cupcakes, which are my all-time favorite and the basis for any cream cheese cupcake I make. Plus, how can you go wrong when you add Guinness?


Here's what you need:
  • 1 cup Guinness Beer
  • 1 cup butter
  • ¾ cup cocoa powder (I used Hershey's unsweetened cocoa powder)
  • 2 cups flour
  • 2 cups sugar
  • 1 ½ teaspoon baking soda
  • ¾ teaspoon salt
  • 2 eggs
  • ½ cup sour cream 
  • 1 8oz block cream cheese, softened
  • 1 egg
  • 1/3 cup sugar
  • 1/8 teaspoon salt
  • 2 teaspoons mint extract (I didn't have mint extract so I used 1 teaspoon of peppermint extract)
  • ¾ cup mint chips (I used Andes) 
And the steps:
  1. Combine beer and butter in a saucepan. Melt butter over medium heat. When butter has melted, whisk in cocoa powder. Remove from heat and let cool. (I did this in the microwave since that's so much easier and faster than doing it over the stove)
  2. With a hand mixer, beat together cream cheese, sugar, egg, salt and extract. Stir in mint chips. Set aside. (I microwaved the cream cheese for 45 seconds.  If the cream cheese is not at room temperature, it won't sink when you bake it).
  3. In a small bowl, combine flour, sugar, baking soda and salt. Set aside.
  4. In a mixer, beat eggs and sour cream until blended. Slowly beat in the beer mixture, just until combined. Carefully stir in flour mixture and continue beating until well mixed.
  5. Line cupcake pans and fill each cup 2/3 full with chocolate batter. Drop a tablespoon full of cream cheese mixture in the center of each cupcake. Bake in a pre heated 350 degree oven for 20 minutes. Let cool in pan for 5 minutes before transferring to a cooling rack. Makes 30 cupcakes.(Mine took about 3 more minutes to cook completely, but I made them too big because I only got 24 cupcakes...)
I totally forgot to take pictures of all of the steps because I was multi-tasking by making my dinner at the same time.  Here's a picture of the finished batter in the cupcake pan:


And with the cream cheese mixture:


After baking:


The final product:


The verdict: These cupcakes were fabulous, as I expected.  They were better than any other cream cheese cupcake I've ever made even.   The cake had a rich chocolate flavor that I fell in love with; thank you Guinness!  And the cream cheese filling was equally good.  My sister also loved them, so the were pretty much instantly gone.  I will definitely be making these again! 

P.S. These cupcakes are also great with cream cheese frosting.  For an easy cream cheese frosting, beat together 1 cup of softened butter and 1 cup of softened cream cheese.  Add 1 teaspoon of vanilla extract and 2 cups of powdered sugar, adding it one cup at a time.  Voila, delicious and fast frosting!

The Bottom Line: LOVED IT!!!  

Friday, March 22, 2013

Make Cake Taste Like It's From A Bakery

Since I had the oven on to make my dinner, I decided to try a dessert I've pinned. I chose this one because it was fast and easy. Plus, I had pinned it and Kelsey G. had also suggested that I try this recipe on the Recipes Jenn Should Try board on Pinterest. 


Here's the pin description:

Step 1: Look at the directions on the cake mix Step 2: Add one more egg (or add 2 if you want it to be very rich) Step 3: Use melted butter instead of oil and double the amount Step 4: Instead of water, use milk. Step 5: Mix well and bake for the time recommended on the box.

I used white Betty Crocker cake mix.

I did just as the pin description said and got this: 


Notice how thick the batter is!


I made cupcakes so here's the batter in the pan:


And the cupcakes after I frosted them (I used cinnamon roll frosting):


Can you tell how fluffy these cupcakes are?


One word: delicious!  They are so much better than normal cake from a box.  They have a much lighter, fluffier texture with a slight butter taste.  My mom and dad said that they were "okay, but too greasy."  Yeah, they definitely were greasier than normal cake, which is expected since there is double the amount of butter than oil in your typical boxed mix.  Although they were greasier, I don't think it was overpoweringly greasy like my parents made it out to be; they just don't like new things. Cake this way is great, but don't forget that it adds a lot of fat and calories. 

Bottom Line: LOVED IT!   

P.S. I read the labels of all the big name brands (Betty Crocker, Duncan Hines, and Pilsbury), and they all contain trans-fat.  So, I will be making my cupcakes from scratch now on out, but if you don't have the time or lack baking skills, this definitely makes cake mix taste better! 

Monday, March 18, 2013

Edible Glitter

 If you go to a crafting store that has decorative baking supplies, it's amazing to see what edible things that they have come up with: pearls, shimmer dust, glitter...and what's even more amazing (not really) is how much it costs.  A small container of sprinkles is like $5.  So, the idea of making your own edible glitter at home from two cheap ingredients is awesome.  For $5, you can have pounds of sprinkles! 


The description that was on the pin:  

 holy crap. seriously??? 1/4 cup sugar and 1/2 teaspoon of food coloring mixed, bake10 mins in oven on 350 degrees to make edible glitter!

And the original link, which doesn't say anything else.

Since I already had the oven on for another batch of cheesy cauliflower breadsticks (they are seriously so freaking good), I decided to try to make some blue glitter.

I put the sugar and food coloring in a mini bread pan and mixed them together:


Then I popped it in the oven for 10 minutes.  I took it out and stirred it.  I could tell it wasn't ready because there was still food dye that was wet, and the sugar was really clumpy.

I put it in for another 10 minutes, then stirred it, and put it in for another 5.  Then I was over it.

Here's the end result.  It's still clumpy so if you want it to be smooth, you're going to have to break it down somehow:


Here's the side by side comparison of the before it was put in the oven and afterwards:


Can you tell the difference?

Does it look like glitter? No.  Is it sparkly? Slightly.  Is it any different than other sugar sprinkles that you find at the grocery store?  Maybe a little more sparkly. Is it worth turning your oven on and baking a small amount of sugar for almost a half hour?  Your call, but I would say no.  I think that this recipe is only worth it if you want a certain color of sprinkles and have run out of them, and you already have the oven on.  

Bottom Line: NOT WORTH IT!